

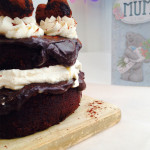
Magic cake you guys! It’s actually magic! Or it’s science, which is kind of like magic to those of us who don’t understand science (i.e. me). You mix up one cake batter, pour it into a pan, bake it and voila – you have three separate layers when it’s done. A dense, chewy layer. A creamy custard layer. And a light sponge layer. It’s magic!! I’m very excited about it!

I was first introduced to this amazing cake by Lily at Little Sweet Baker and as soon as I saw it I knew I had to give it a go and see for myself. I used her recipe, the only thing I changed was I made mine chocolate because I’m a sucker for chocolate. I was sure mine wasn’t going to work and there was gonna be some secret magic touch you needed, waiting for it to cool down so I could cut into it and see if it worked was like torture! As soon as I could I sliced it down the centre and there it was, all layered! It really does do all the work itself, that clever little cake! It’s funny actually, a few days before I saw this beauty of Lily’s blog my best friend’s mum (or my second mother, as I like to call her) had been telling me about this dessert she used to have when she was a kid – it was called Jello 1-2-3 and you’d mix it up with water and put it in the fridge to set, and it set into three separate layers – a jello bottom, a mousse middle and foamy top! It must use the same magic!

I did have to start over halfway through though because I overwhipped my egg whites, I still maintain it wasn’t my fault I’d only been whipping them for 60 seconds I swear! But this still happened:

The last thing you wanna see while whipping egg whites!
I blame the eggs, they were out to get me 😉 Moving on…

This chocolate magic cake isn’t only magic, it’s really yummy too! I adored the texture, for me it was kind of like eating a really creamy cheesecake. I’m going to be honest with you guys, I didn’t share much of this one, I just couldn’t part with it! You should definitely give this baby a go, not just to see the magic for yourselves but also because it really is so tasty! It’s easy to make too, as long as you don’t have eggs that are out to sabotage you that is! The hardest part is waiting to be able to cut into it so you can see the layers!

I’m going to bring this magic treat along to Fiesta Friday, because what’s a party without a little magic? Come party with us, it’s our lovely host’s birthday so there’s no better time! We’ve also got some fab co hosts this week, Suzanne and Sue
I’d love to see you all on Social Media, you can find me on Twitter, Facebook, Instagram, Google+ and Bloglovin’
October is Lupus Awareness Month and I’m trying to raise awareness for the cause. You can find out more info and enter my giveaway here
Today’s Lupus fact (click the photo for more info):


- 4 large egg whites, room temperature
- 4 large egg yolks, room temperature
- 150g sugar
- 1tsp vanilla extract
- 125g unsalted butter, melted and cooled
- 500ml luke warm milk
- 115g plain flour
- 40g cocoa powder
- Icing sugar for dusting (optional)
- Preheat the oven to 180C/350F. Line a 8x8" baking pan with greaseproof paper, leaving overhang at the sides.
- Using the whisk attachment on your stand mixer, or a handheld electric mixer, beat your egg whites until stiff peaks form. Set aside.
- In another bowl, beat the egg yolks, vanilla and sugar until pale - about 2 minutes.
- Add the butter to this mix and beat until it thickens.
- Add the milk gradually and mix until fully combined.
- Sift the flour into mix and beat until all combined.
- Gently fold the egg whites into the mixture until just combined, working quickly. It may be a bit lumpy but that's okay.
- Carefully pour the batter into your prepared pan and bake for 10 minutes. Then reduce the oven temperature to 160C/325F (without opening the oven) and bake for about 45-50 minutes. It is done when the cake is set but has a slight jiggle to it.
- Leave to cool completely in the pan on a wire rack before turning out and cutting into squares
- Dust with icing sugar before serving (if using)
- Store in the fridge for 3-5 days.
- Remove from fridge 15 minutes before serving.


Sharing with these fab link parties and blog hops…
Fiesta Friday, Foodies Fridays, Show Me Saturdays, Super Saturdays, Scraptastic Saturdays, Frugal Crafty Home, Bewitchin’ Projects, Inspiration Monday, Time to Sparkle, Hit Me With Your Best Shot, Inspire Me Wednesday, Create It Thursday


Omg! Your chocolate version looks amazingly delicious, you made the magic cake even better with chocolate, wow! I hate it when evil eggs are out to get you, those darn eggs lol
Thank you Lily! I’m glad you agree with me on the evil eggs, hehe!
Amazing! I will be pinning this for sure. Have a great weekend Michelle!
Thanks Julie, have a great weekend too 🙂 x
Hi Michelle, I too have been interested in these magic cakes lately so I’m really glad to hear your input and see your chocolate interpretation! It really does look yummy! Thank you for bringing to the party this week!!!
Thank you Sue 🙂 Have a great weekend!
Whoa! Did you say magic? These are so good, Michelle. You never fail to amaze us with your magical, yummy creations. <3 Happy FF to you.
Thank you Jhuls! I do love some magic in my baking!! Happy FF to you too, I hope you’re having a great weekendx
This looks divine! You had me at Magic and Chocolate! 😀 Can’t wait to try this (and not share it!!)
Thank you! And I definitely approve of not sharing!
They look the business! Magic for sure!
Thanks Mr Fitz 😀 x
Isn’t it wonderful when you can create magic in the kitchen? Brilliant chocolate cake, I’m sure you savored it all to the last morsel :).
Thank you! I did!
Hi Michelle – just saw this on your IG feed and hoped that you had posted it to FF today!! It looks and sounds amazing andI love that you have added chocolate to it too. Those darn eggs may have done their best to try and sabotage the magic but you prevailed!!
Not even evil eggs can defeat magic haha! Thank you Selma 😀
Wow! Looks delicious!
Thank you 🙂
Oh my! These look amazingly good! 🙂
Thank you!!
Your cake looks really magic! Thanks for sharing it, I’m sure it will be very useful on of these days when I will need some sweet treats!
Thank you, it’ll definitely satisfy any sweet craving! x
You are right this cake is magic, it loos so good, I want some! 🙂 Love your blog name, and your baking creations have my mouth watering! 🙂 I am now following you because I am looking forward to seeing more great baking creations!
Cathy
Thank you so much Cathy, you’re so sweet 😀 xx
This looks so wonderfully delicious!! You and lilly have the best recipes!! I love that you made the chocolate version, perfect magic!! Thanks for sharing …saving it now. 🙂
Thank you 😀 I’m glad you liked it!
Your post and the gorgeous pictures have completely inspired me to try this recipe and see the magic with my own eyes asap. Thanks for sharing 🙂
I hope you like it, let me know what you think! Thanks 😀 x
It looks great, Michelle!
Very interesting cake 🙂 just like magic, you’ve got that right :p
Happy FF!
Thank you Sarah! x Happy FF!
One batter, three layers! Woah, that’s magic indeed!
The only explanation!
Michelle…this looks so crazy yummy! I’m interested to see how this works…so you have me inspired to make this. I want to experience each layer!! Thank you so much for sharing.. AWESOME post!! <3
I can die or kill for chocolate <3 this is such an awesome post 🙂
Thank you! x
I’m a lot like you–I really don’t understand a lot of science! I married a science teacher so I rely on him to explain mysteries like this cake! By the way this cake looks like the perfect way to satisfy my sweet tooth. Pinning it!
I host a weekly blog hop called Frugal Crafty Home and I would LOVE to have you join us! Any of your recipes would be a great addition! The party goes live at 8PM Central Time. Hope to see you there!
Personally, I think magic is a more fun explanation anyway haha! Thank you, I’ll definitely check it out!
Sounds like magic to me! 😉
It has to be! 😀
So cool! I’ve never seen a cake do that. I’m going to pass this on to a few friends of mine. They’ll love this. Thanks for linking up for Scraptastic Saturdays. This post will be shared via FB/Twitter/Pinterest. Have a wonderful day. Hope to see you next Saturday.
Thank you! 🙂
Really Amazing and magical Michelle. I can almost see my kids’ reactions when I bake this cake.! Which just goes to say that I shall be trying this one soon! Thanks for the recipe! 🙂
Thank you Indu, I’m sure your kids will love it – i hope you do too!
I love recipes like this! And yes, that layer trick does seem quite magical! Thanks for sharing. I will be trying these out! Found you on the Frugal Crafty Home link up =)
Thank you for stopping by, I hope you enjoy the magic 😀 x
This cake looks like magic, true 🙂 chocolate is magic in the end …
You’re absolutely right!
I need to try this magic cake – it looks SO good
Thank you! I hope you like it if you do try it, let me know 😀
This looks absolutely delicious111
Thank you!
I’ve never seen a cake do that. I MUST be magic! 😉 Thanks for linking up at Show Me Saturday! Hope to see you there again this week.
I don’t think there’s any other explanation 😉 Thanks!
I swear, one of these days I’m going to make one of these. They just look so. .. COOL! Thank you for linking up with #FoodieFridays!
Christie
http://akitchenhoor.blogspot.com/
Thanks Christie, it’s definitely worth making just to see it happen! It’s really just a bonus that they’re yummy too!